|
 Topic: help !!! side walls rotten pennine fiesta Topic: help !!! side walls rotten pennine fiesta
|
Page: 1 2 3
  |
29/3/2011 at 10:05am
Location: Blyth Northumberland
Outfit: Bailey Pageant Monarch two berth
 View Profile
 Reply
Reply
 Quote
Quote
|
Joined: 30/8/2010 Platinum Member 
Forum Posts: 767
| Site Reviews Total: | 54 |
|
| Site Reviews 2025: | 0 |
| Site Reviews 2024: | 0 |
| Site Reviews 2023: | 0 |
| Site Reviews 2022: | 0 |
| Site Reviews 2021: | 5 |
| Site Reviews 2020: | 2 |
| Site Reviews 2019: | 0 |
|
| Site Nights 2025: | 0 |
| Site Nights 2024: | 0 |
| Site Nights 2023: | 0 |
| Site Nights 2022: | 0 |
| Site Nights 2021: | 32 |
| Site Nights 2020: | 15 |
| Site Nights 2019: | 0 |
|
Floor looks good, very practical. I put new carpet in mine I will see how long it looks good?
Fred.
|
31/1/2015 at 11:22am
Location: Blyth Northumberland
Outfit: Bailey Pageant Monarch two berth
 View Profile
 Reply
Reply
 Quote
Quote
|
Joined: 30/8/2010 Platinum Member 
Forum Posts: 767
| Site Reviews Total: | 54 |
|
| Site Reviews 2025: | 0 |
| Site Reviews 2024: | 0 |
| Site Reviews 2023: | 0 |
| Site Reviews 2022: | 0 |
| Site Reviews 2021: | 5 |
| Site Reviews 2020: | 2 |
| Site Reviews 2019: | 0 |
|
| Site Nights 2025: | 0 |
| Site Nights 2024: | 0 |
| Site Nights 2023: | 0 |
| Site Nights 2022: | 0 |
| Site Nights 2021: | 32 |
| Site Nights 2020: | 15 |
| Site Nights 2019: | 0 |
|
Best of luck, I have a caravan now witch has no damp. I learned from my experience with the camper.
Fred.
|
02/2/2015 at 1:36am
Location: None Entered
Outfit: Pennine Fiesta
 View Profile
 Reply
Reply
 Quote
Quote
|
Joined: 26/7/2004 Standard Member
Forum Posts: 17
| Site Reviews Total: | 11 |
|
| Site Reviews 2025: | 0 |
| Site Reviews 2024: | 0 |
| Site Reviews 2023: | 0 |
| Site Reviews 2022: | 0 |
| Site Reviews 2021: | 0 |
| Site Reviews 2020: | 0 |
| Site Reviews 2019: | 0 |
|
| Site Nights 2025: | 0 |
| Site Nights 2024: | 0 |
| Site Nights 2023: | 0 |
| Site Nights 2022: | 0 |
| Site Nights 2021: | 0 |
| Site Nights 2020: | 0 |
| Site Nights 2019: | 0 |
|
This is a follow up to my post of 2013 re: rotten 2003 Fiesta. Subsequent to the eye-watering £1400 quote to replace the tail wall by Pennine, I asked if they could supply the panel (wood/bonded aluminium skin). They said they don't stock the same shape. So I'd have to cut the panel myself - and it would be (I think)£400 plus delivery (which they said I'd have to arrange myself). Still a lot of money, still a lot of work, and not the best or most helpful response I could have hoped for considering that the rot probably began when the unit was less than 8 years old... and for the first 6 years it was kept in a garage! So I decided to have a go. As it turned out, the tail board - made of poplar ply - had turned into near mush, some of soaking wet despite no rain for weeks, rot had spread to a limited extent to BOTH side walls ends AND one corner of the floor. It was very dispiriting. Any how, I photographed every cable, screw and bracket as I took it apart which helped later. I bought marine ply for the tail. The external alu-skin came off slowly from the ply, a sharpened wall paper scraper helped cut through glue. I used that as the template and cut the new board, glued on the alu-skin then backed with fablon adhesive vinyl - a good match found on e-bay. A ships chandler in Whitby supplied sealant and glue. The side walls, I left in place, chiselled the rot of the back of the alu back to decent wood, then cut thin marine ply to fit the missing sections (they were less than 30cm long). I treated all newly sawn edges with Ronseal rot killer and wood hardener - a kind of fast drying resin I think, then glued replacement wood in place and finished with car body filler (the same stuff as wood filler but cheaper) then sanded when dry. I cut the corner of the floor off,(again quite small and under the cupboards)then matched up with a replacement triangle of marine ply and attached with glue and metal brackets, then body filler to fill cracks. The re-fixing of everything was quite straight-forward, though crushingly, my meticulous cutting round the perfectly symmetrical alu-skin end-panel had me scratching my head when I offered it up to the side panel and found it wasn't right! HOW? What the... - one side panel hung down lower than the end panel by 1cm... Reason? On closer inspection, I found out that that side panel had not been glued accurately to the side alu-skin in the Pennine factory. A bodge had been done so the panels had never fitted properly with the top edge trim disguising the bodge by the Pennine 'craftsmen'.
So why did it rot? Simple. The rear light clusters were soaking wet inside. The rain runs down the back of the unit, over the flat top surface of the cluster, trickles into the lens through the joint between lens and cluster body.. however slowly, I don't know, but it then steadily fills the cluster, until it finds a point of exit... which is the hole for the cabling, which leads to the drilled holes through the poplar ply, which soaks up water like blotting paper! The original fitting has a shallow rubber grommet in the ply, but this is to prevent cable chafing, and provides no water protection. In fact it looked like the cables were wrapped with paper sleeves, which help wick water more efficiently up into the plywood!!! All the light fittings were corroded and so I had to take the myriad easy to lose metal contacts apart and sand them clean before reassembly. I drilled small holes in the lens bottom surface for drainage, but a simple strip of insulation tape along the lens/body joint seems to have fixed the problem. Infuriating that a such a cheap fix would save hundreds or possibly £1400 or so of work!
As it is I think the ply (NOT B&Q stuff) sealants and a Bosch jigsaw cost me about £240 all in. (I still would have had to buy the jigsaw if I had bought the £400 panel from Pennine).
I also found that the gas cupboard at the front was frequently soaking inside, so I took off the cover gripping strip at the top-front of the unit and sealed it before rescrewing. (There was NO sealant behind that strip, and when the tent is erected water trickles in behind it. Since then, however, water still gets in. I now believe that If you store outside, tail down, water runs in round the front door, then sits, filling the bottom lip, until it runs up over the level of the two holes that the door pegs sit in. These holes lead directly into the front gas storage cupboard and will then run into the whole unit potentially.
I have since bought a winter cover (Kampa) which I subsequently found is NOT waterproof, despite what you might hear. It is deeper, so keeps it cleaner, but water will get through - so you MUST keep the original cover in place beneath.
I would dearly love to renew my Pennine cover, but I fear their prices now. I wish they had been more financially helpful in the first place, considering it was only 10years old, because I love our Fiesta, and had thought highly of Pennine craftsmanship. They are a British company, who I have always wanted to see succeed.
I just despair that such a simple design oversight with the lights ended up costing me so much in time and money. (If anyone's interested, I can post pictures of the damage, to illustrate the story.)
|
02/2/2015 at 3:09am
Location: Auckland New Zealand
Outfit: Toyota Hiace conversion
 View Profile
 Reply
Reply
 Quote
Quote
|
Joined: 05/4/2006 Platinum Member 
Forum Posts: 688
| Site Reviews Total: | 0 |
|
| Site Reviews 2025: | 0 |
| Site Reviews 2024: | 0 |
| Site Reviews 2023: | 0 |
| Site Reviews 2022: | 0 |
| Site Reviews 2021: | 0 |
| Site Reviews 2020: | 0 |
| Site Reviews 2019: | 0 |
|
| Site Nights 2025: | 0 |
| Site Nights 2024: | 0 |
| Site Nights 2023: | 0 |
| Site Nights 2022: | 0 |
| Site Nights 2021: | 0 |
| Site Nights 2020: | 0 |
| Site Nights 2019: | 0 |
|
Try Undercover
probably half the price of one from Pannine
-------------
Alan in New Zealand
|
02/2/2015 at 8:21am
Location: Redditch
Outfit: Changes almost daily!!
 View Profile
 Reply
Reply
 Quote
Quote
|
Joined: 11/8/2014 Platinum Member 
Forum Posts: 1365
Tent Reviews: 2
| Site Reviews Total: | 0 |
|
| Site Reviews 2025: | 0 |
| Site Reviews 2024: | 0 |
| Site Reviews 2023: | 0 |
| Site Reviews 2022: | 0 |
| Site Reviews 2021: | 0 |
| Site Reviews 2020: | 0 |
| Site Reviews 2019: | 0 |
|
| Site Nights 2025: | 0 |
| Site Nights 2024: | 0 |
| Site Nights 2023: | 0 |
| Site Nights 2022: | 0 |
| Site Nights 2021: | 0 |
| Site Nights 2020: | 0 |
| Site Nights 2019: | 0 |
|
Quote: Originally posted by Harpmaker on 02/2/2015
Try Undercover
probably half the price of one from Pannine
Undercover are brilliant. I know loads of people who have been very happy with them. Unfortunately, they are a hand made product, mostly made to customer's specification, and their prices tend to range from £20 cheaper to £20 more expensive than Pennine, on average. Even their 'off the shelf; items tend to be the same sort of price, as they are usually made to order, and, again, all quality stuff. They argue theirs are better, which is probably true, but, if cost is a factor, may not be an option.
-------------
The one good thing about being wrong is the joy it brings to others..
|
02/2/2015 at 10:26am
Location: Blyth Northumberland
Outfit: Bailey Pageant Monarch two berth
 View Profile
 Reply
Reply
 Quote
Quote
|
Joined: 30/8/2010 Platinum Member 
Forum Posts: 767
| Site Reviews Total: | 54 |
|
| Site Reviews 2025: | 0 |
| Site Reviews 2024: | 0 |
| Site Reviews 2023: | 0 |
| Site Reviews 2022: | 0 |
| Site Reviews 2021: | 5 |
| Site Reviews 2020: | 2 |
| Site Reviews 2019: | 0 |
|
| Site Nights 2025: | 0 |
| Site Nights 2024: | 0 |
| Site Nights 2023: | 0 |
| Site Nights 2022: | 0 |
| Site Nights 2021: | 32 |
| Site Nights 2020: | 15 |
| Site Nights 2019: | 0 |
|
When I had my camper I put a tarpaulin over it and down the sides then put the breathable cover on to hold it down. Kept all my hard work nice and dry over the winter. I put an air bed under the camper cover to stop puddles.
|
|




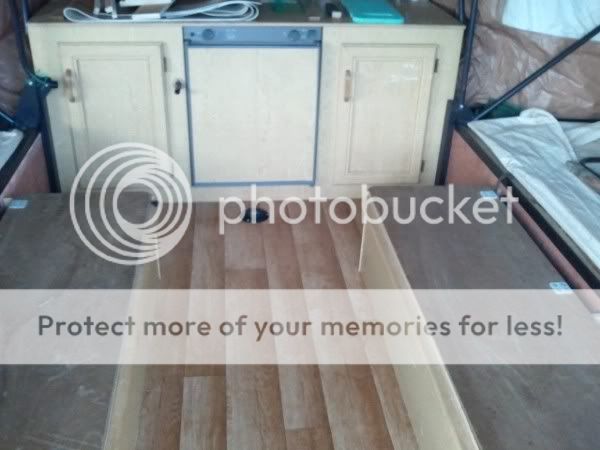
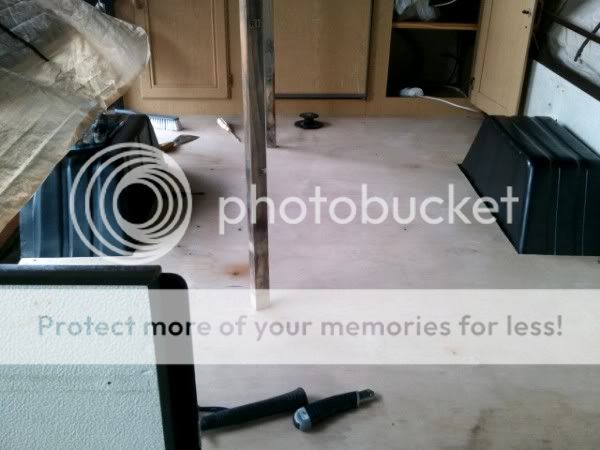
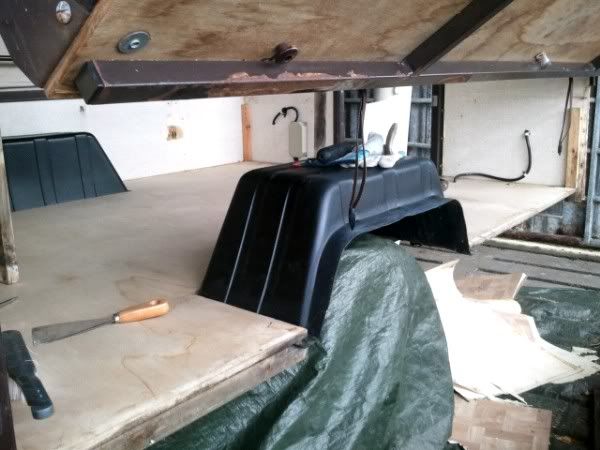
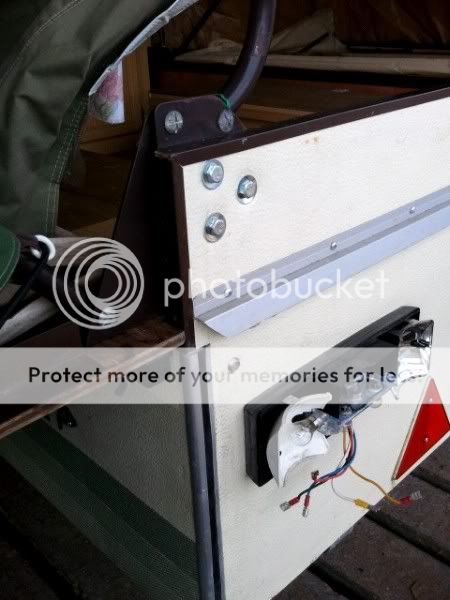 pics are in the wrong order but you get the jist of before and after, back and side walls replaced , new linoleum floor ,the pic of the back corner is where i had to replace the rivets with bolts.


 via mobile 17/7/2019 at 8:51pm


