Advertisement
Message Forums |
|
 Topic: LED replacement bulb confusion Topic: LED replacement bulb confusion
|
Page: 1 2
  |
27/5/2012 at 7:37pm
Location: West Mids
Outfit: Swift Ace Statesman & X-Trail 2.0
 View Profile
 Reply
Reply
 Quote
Quote
|
Joined: 22/9/2008 Diamond Member 
Forum Posts: 2617
| Site Reviews Total: | 11 |
|
| Site Reviews 2024: | 0  |
| Site Reviews 2023: | 0  |
| Site Reviews 2022: | 0  |
| Site Reviews 2021: | 0  |
| Site Reviews 2020: | 0  |
| Site Reviews 2019: | 0  |
| Site Reviews 2018: | 0  |
|
| Site Nights 2024: | 0 |
| Site Nights 2023: | 0 |
| Site Nights 2022: | 0 |
| Site Nights 2021: | 0 |
| Site Nights 2020: | 0 |
| Site Nights 2019: | 0 |
| Site Nights 2018: | 0 |
|
Right then Pam. Got you're photo's thanks, which confirm they are the same fitting as I thought and are which a pig to get apart!
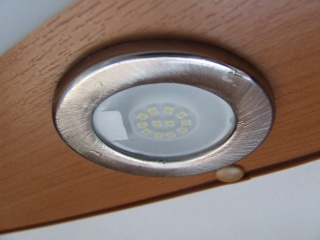
Here's one of mine with the replacement LED lamp in-situ.

You've obviously sussed out how easy it is to pull the whole fitting out, but the awkward bit is opening them as I believe the heat of the halogen bulb causes an issue with the fitting. On the reverse side, you'll see the outer trim is clicked onto the main fitting by clicking together then a small twist to lock. I found it best to gently cut away the small pieces off the outer trim that engage between the trim and fitting (see photo below, although the pieces are already cut off in the pic. I think there were four pieces although I've only highlighted two positions in the photo).
This allows you to prize the two bits apart, but you'll find the glass lens will drop out.
Fit the replacement bulb and clip the fitting back together, but I found it went together again perfectly well despite my having trimmed off the tags.
I did find that the replacement LED lamp drooped downwards and wasn't perfectly happy with it's fit; I simply dropped a blob of hot-melt adhesive onto the back of the lamp before I fitted it into the fitting, then held the lamp tight against the fitting for 30secs or so while the adhesive set. You won't be changing these again, so no issue.
The main trick is to make sure the fitting and trim are clicked back fully as if they aren't, there will be a visible gap between the trim and the wood trim of the Heki into which they fit.

If you compare your fitting with the photo above, I think you'll see which tags I mean. If you do go down the same route, arm yourself with a new blade in a craft knife to do this and make sure you've some time on your hands as you'll need some patience to do this.
Finally, as the Heki lights are fitted and switched in pairs, you could consider just upgrading a switched pair to see how you get on.
Hope this helps you out. Once you've done the one, you'll suss out the best way to tackle the others. Just take it carefully.
-------------
Paul
Every day's a school day!
|
|
|
6170 Visitors online !
Free UKCampsite.co.uk Window Sticker - Recommend to Friend - Add a Missing Campsite
[Message Forums]
[Caravan Sites & Camping]
[Company Listings]
[Features / Advice]
[Virtual Brochure]
[Shop!]
[Reception]
[Competitions]
[Caravans & Motorhomes For Sale]
[Event Diary]
[Contact Us]
[Tent Reviews]


Please note we are not responsible for the content of external sites & any reviews represent the author's personal view only. Please report any error here. You may view our privacy and cookie policy and terms and conditions here. All copyrights & other intellectual property rights in the design and content of this web site are reserved to the UKCampsite.co.uk © 1999 - 2024 |

Advertisement
|
|
|


