Home

   Log in or Register


Insurance Quotes
forums Campsite Search Comp Directory tips virtual brochure Profile
Tent and Awning Reviews Competitions Caravans and Motorhomes For Sale Shopping Diary Advent Calendar

Advertisement

Message Forums

Welcome Guest Register Login Search The Forum Posts Since Last Visit
 Reception - All Forums
   Caravans and Caravanning -  Caravan Repairs, Servicing and Maintenance
Share   Post on X / Twitter  Share on Facebook  Email  Printer Friendly Version Print
Subject Topic: Another Damp Bailey :-( Post Reply Post New Topic
17/6/2013 at 8:58pm
 Location: Exeter Devon
 Outfit: Grand Voyager & Bailey Beachcomber 6
View sjbilton's Profile View Profile   Reply to sjbilton Reply   Quote sjbilton Quote  
Joined: 27/1/2005

Standard Member
Standard Member

Forum Posts:   31

Site Reviews Total: 1
Site Reviews 2024: 0  
Site Reviews 2023: 0  
Site Reviews 2022: 0  
Site Reviews 2021: 0  
Site Reviews 2020: 0  
Site Reviews 2019: 0  
Site Reviews 2018: 0  
Site Nights 2024: 0
Site Nights 2023: 0
Site Nights 2022: 0
Site Nights 2021: 0
Site Nights 2020: 0
Site Nights 2019: 0
Site Nights 2018: 0

1994 Bailey Beachcomber.

The door has obviously suffered from a stiff hinge for a while as we now have a crack off the top left (hinge side of the door). This has then allowed water into that side panel over this wonderfully wet winter/spring/summer so I've got quite a repair job on my hands. Undaunted I will succeed with your help.

I've gone through the job in my head, and having read the intrepid adventures of the Fix-it-club I can do it.

I need to remove the front side cupboard & bed base, and the kitchen to the rear of the door.

The first obstacle is removing the front side cupboard.


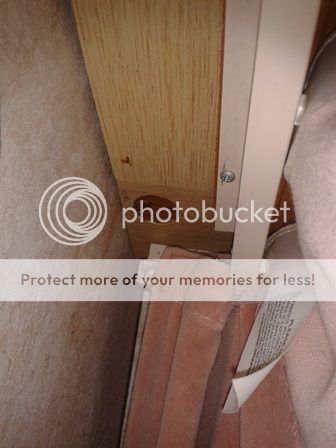
This one is visibly fixed to the outer wall inside the cupboard, on the top corner closest to the door:


and at the front end it is fixed to the side wall of the caravan:

and to the rail across the front of the van above the windows:


I guess it has been screwed in place before the roof was skinned?

So the first question of many is how to locate and cut the fixings into the carcase of the cupboard without marking the roof or the cupboard?

Thanks for your help in anticipation

Steve


-------------
Steve Bilton
Exeter, Devon


17/6/2013 at 9:31pm
 Location: Essex
 Outfit: 1996 Bailey Senator 5000
View jayc001's Profile View Profile   Reply to jayc001 Reply   Quote jayc001 Quote  
Joined: 31/5/2012

Platinum Member
Platinum Member

Forum Posts:   501

Site Reviews Total: 3
Site Reviews 2024: 0  
Site Reviews 2023: 0  
Site Reviews 2022: 0  
Site Reviews 2021: 0  
Site Reviews 2020: 0  
Site Reviews 2019: 0  
Site Reviews 2018: 0  
Site Nights 2024: 0
Site Nights 2023: 0
Site Nights 2022: 0
Site Nights 2021: 0
Site Nights 2020: 0
Site Nights 2019: 0
Site Nights 2018: 0

It's stapelled from above and with lots and lots of staples. Either use  a pad saw to cut through them or as I did get a decent wall paper scraper and hammer it through the space between the ceiling and locker. This should shear the staples.


17/6/2013 at 9:36pm
 Location: Essex
 Outfit: 1996 Bailey Senator 5000
View jayc001's Profile View Profile   Reply to jayc001 Reply   Quote jayc001 Quote  
Joined: 31/5/2012

Platinum Member
Platinum Member

Forum Posts:   501

Site Reviews Total: 3
Site Reviews 2024: 0  
Site Reviews 2023: 0  
Site Reviews 2022: 0  
Site Reviews 2021: 0  
Site Reviews 2020: 0  
Site Reviews 2019: 0  
Site Reviews 2018: 0  
Site Nights 2024: 0
Site Nights 2023: 0
Site Nights 2022: 0
Site Nights 2021: 0
Site Nights 2020: 0
Site Nights 2019: 0
Site Nights 2018: 0

Pad saw method sucked as the ceiling paper was abrasive and wore the skin off my knuckles. Hammering through the staples was quicker and less painful.


21/6/2013 at 4:49pm
 Location: Exeter Devon
 Outfit: Grand Voyager & Bailey Beachcomber 6
View sjbilton's Profile View Profile   Reply to sjbilton Reply   Quote sjbilton Quote  
Joined: 27/1/2005

Standard Member
Standard Member

Forum Posts:   31

Site Reviews Total: 1
Site Reviews 2024: 0  
Site Reviews 2023: 0  
Site Reviews 2022: 0  
Site Reviews 2021: 0  
Site Reviews 2020: 0  
Site Reviews 2019: 0  
Site Reviews 2018: 0  
Site Nights 2024: 0
Site Nights 2023: 0
Site Nights 2022: 0
Site Nights 2021: 0
Site Nights 2020: 0
Site Nights 2019: 0
Site Nights 2018: 0

Many thanks jayc001... lots of staples and a screw for good measure...

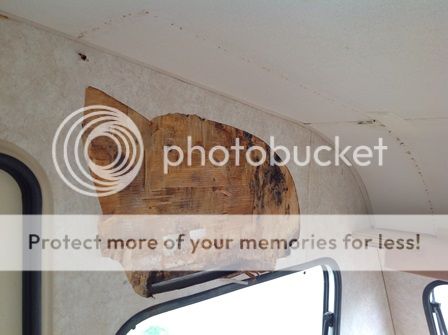
So off came the cupboard, and I thought I'd just pick at a hole in the paper to see what's up behind... :-(


and like a scab you keep picking :-( :-(


So, I know I need to clear to the left of the door, and to the floor on either side. I've a dehumidifer in there all the time so it is slowly drying out and will continue as I remove the damp wood.

Once I am down to a damp frame I guess I need to get the materials before removing the rotten frame.

I am taking photos as I take it apart to help with the reconstruction. So now I need to start with a shopping list:

1x1/2" timber for frame
1" polystyrene sheets
Wallboard - plain sheet or papered?
Exterior Mastic for resealing the outside trim - roll or tube?

? Wood hardener for existing wood I don't remove?
? Glue - any preferences?

It looks as if there maybe some adhesive between the frame and the aluminum skin - is this going to be a pain to remove? If so how best to do it?

I am sure there will be more later - I'm still taking in the invisible damage...

Thanks in advance.

Steve

-------------
Steve Bilton
Exeter, Devon


21/6/2013 at 5:28pm
 Location: Essex
 Outfit: 1996 Bailey Senator 5000
View jayc001's Profile View Profile   Reply to jayc001 Reply   Quote jayc001 Quote  
Joined: 31/5/2012

Platinum Member
Platinum Member

Forum Posts:   501

Site Reviews Total: 3
Site Reviews 2024: 0  
Site Reviews 2023: 0  
Site Reviews 2022: 0  
Site Reviews 2021: 0  
Site Reviews 2020: 0  
Site Reviews 2019: 0  
Site Reviews 2018: 0  
Site Nights 2024: 0
Site Nights 2023: 0
Site Nights 2022: 0
Site Nights 2021: 0
Site Nights 2020: 0
Site Nights 2019: 0
Site Nights 2018: 0

My bailey rebuild started as a small area and ended up the whole side of van.

I used rough sawn kiln dried timber from B&Q for the frame. Think 25x38mm. A pack was aabout £12 and did an entire side.

25mm kingspan insulation from Travis perkins.

3.6mm hardwood faced ply sheets from TP again.

I used both mastic roll and seal seal on the awning rails.

Used ronseal wood hardner on the frame areas which were wet but no rotten (ie screws gripped).

Glue, well I used polyurethane, solvent free grab and gorilla glue. From experience I'd no go with pu to bond battens to aluminium skin. Gorilla glue to bond insulation to skin and wallboard. grab adhesive on frame to wall board.

The insulation will come away from the skin easy enough with a blunted wall paper scraper.


In order to post a reply you will need to register, or if already registered please log in here

Prev       Next
Quick Links - All Forums - Caravan Repairs, Servicing and Maintenance - Top of Page

Printer Friendly Version Printable version      Share   Post on X / Twitter  Share on Facebook  Email


Latest News, Discounts and Competitions  see all...


3747 Visitors online !

Free UKCampsite.co.uk Window Sticker  -  Recommend to Friend  -  Add a Missing Campsite

[Message Forums]  [Caravan Sites & Camping]  [Company Listings]  [Features / Advice]  [Virtual Brochure]  [Shop!]
[Reception]  [Competitions]  [Caravans & Motorhomes For Sale]  [Event Diary]  [Contact Us]  [Tent Reviews


Please note we are not responsible for the content of external sites & any reviews represent the author's personal view only. Please report any error here. You may view our privacy and cookie policy and terms and conditions here. All copyrights & other intellectual property rights in the design and content of this web site are reserved to the UKCampsite.co.uk © 1999 - 2024


Advertisement


Advertisement


UKCampsite.co.uk
2024 Advent Calendar


Advent Calendar

24 Daily Prizes PLUS a Christmas Day Star Prize worth £999

Request a Reminder