Advertisement
Message Forums |
|
 Topic: DAMP around rear side window!! Topic: DAMP around rear side window!!
|
  |
28/8/2013 at 3:51pm
Location: Anglesey
Outfit: Motorcycle & Tent
 View Profile
 Reply
Reply
 Quote
Quote
|
Joined: 25/9/2008 Silver Member 
Forum Posts: 144
| Site Reviews Total: | 11 |
|
| Site Reviews 2024: | 0  |
| Site Reviews 2023: | 0  |
| Site Reviews 2022: | 0  |
| Site Reviews 2021: | 0  |
| Site Reviews 2020: | 0  |
| Site Reviews 2019: | 0  |
| Site Reviews 2018: | 0  |
|
| Site Nights 2024: | 0 |
| Site Nights 2023: | 0 |
| Site Nights 2022: | 0 |
| Site Nights 2021: | 0 |
| Site Nights 2020: | 0 |
| Site Nights 2019: | 0 |
| Site Nights 2018: | 0 |
|
Bailey Pageant Auvergne 1999.
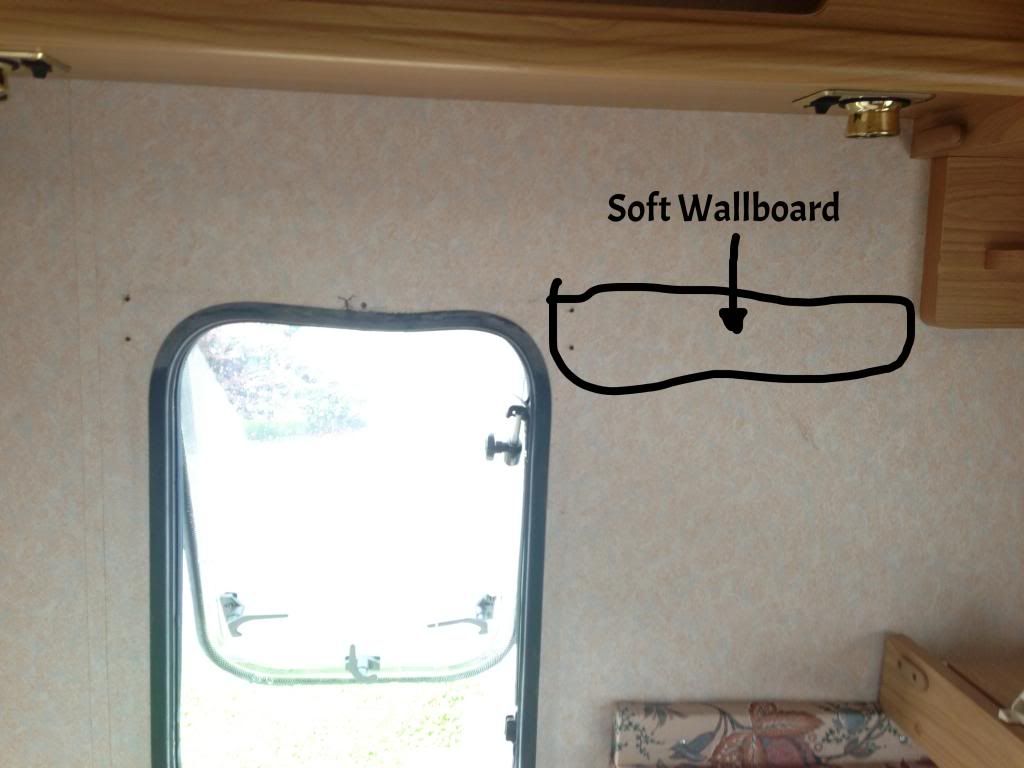
I noticed that the wall board to the top of my rear side window was soft so after our summer hols I decided to investigate, this is what I have found!
These were the screws from the Blind housing so I knew it was definately damp

I removed the blind holder, & you can see the Wall board is already split at the top.

So then proceeded to remove some of the wall paper, & it was upsetting to see this & as you can see some of the wall board was that damp it just came off like wall paper!!

This is when you think to youeself OMG what have I started here, took off more wall paper & some wall board


It does appear the ingress is narrowed down to the top of the window frame area.
Without any wall board left in place this is how it looks

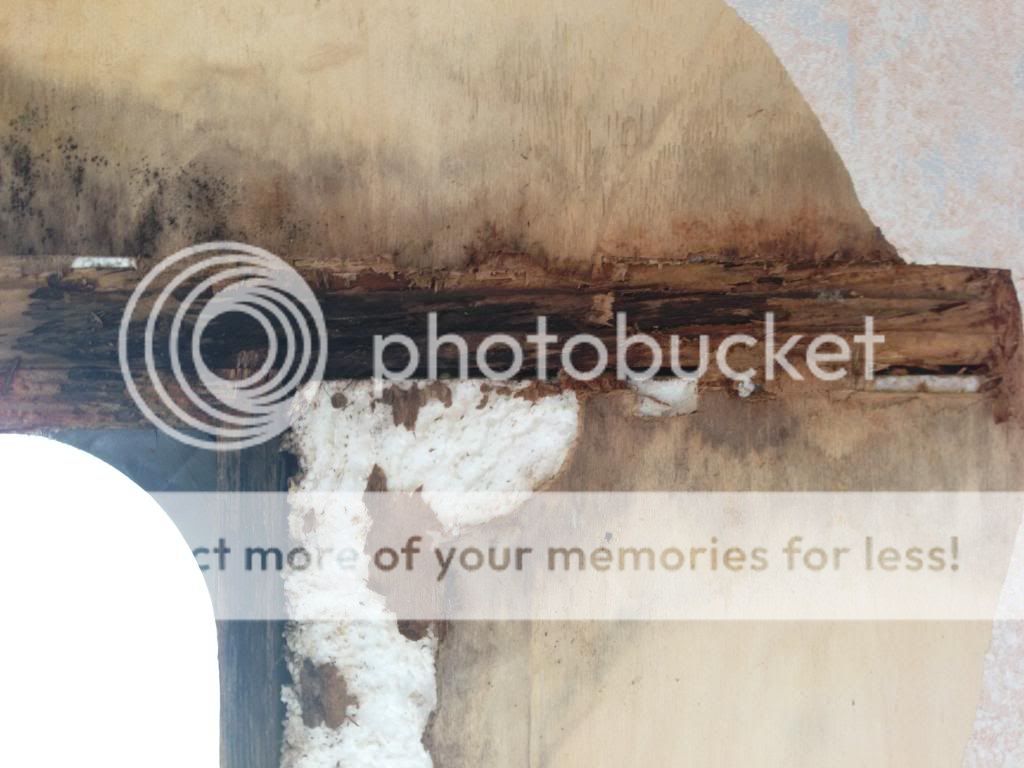
At first thought I was assuming that the damp was coming through the panel seem just below the burgandy decal in the picture, but as it wasnt damp all the way along the wooded strut it cant be?

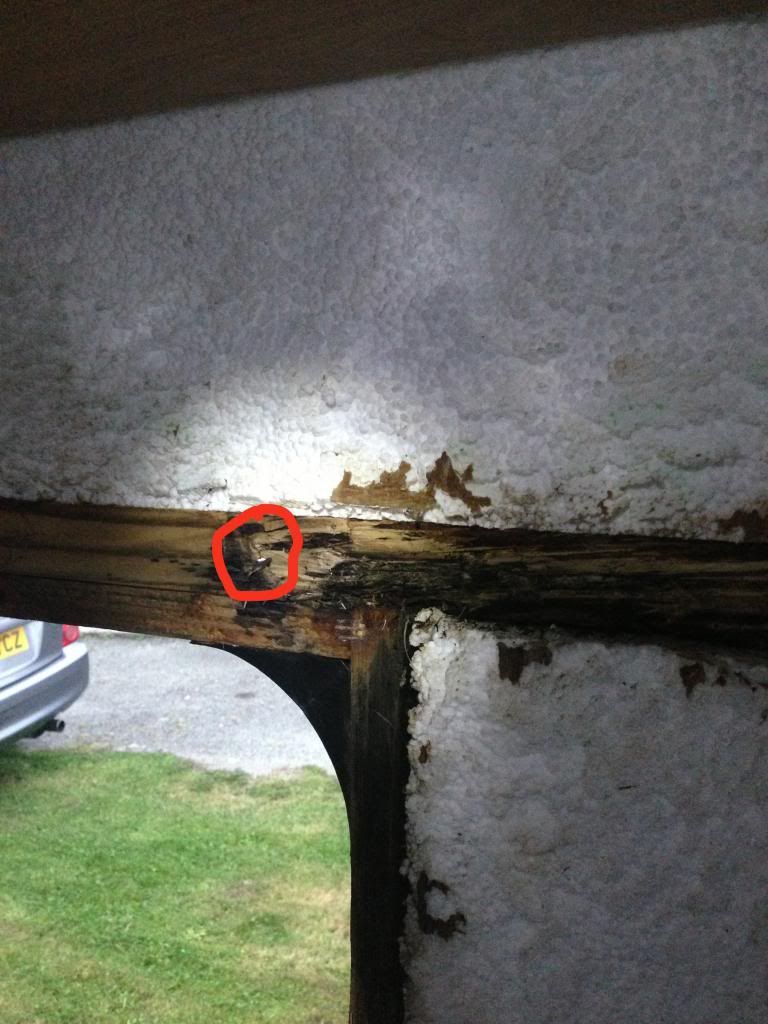
So looking at this next picture a close up of the damp wooden strut above the window frame you can see where the screw (which supports the window on the outside) is coming through the wood, making me think that no sealant must have been used in the screw hole during manufacture, however as Im no expert if anyone else has a theory I am open to suggestions, thx

Having tried to move some of the damp wood & eventually part of the strut itself, I left it overnight back today this is recent pic, you can see it appears to have dried out alot compared to yesterday.

My question now is should I leave it to dry out further & use a damp proofer & wood filler to render this strut.
Or should I just cut & remove the bad part & install a new piece.
I would prefer to install a new piece of wood but Im not sure how to go about cutting the old piece out as I am concerned re damaging the outside skin.
I have a dremel type tool so maybe I could use the small rotating saw on that, but the wood is stguck to the aluminuim skin so any assistance regarding removal of this would be greatly received 
Finally I will look to use a sealant (not silicone) to put into the screw holes and maybe use some mastic on the outside (wont be seen) to ensure a leak free area.
I am going to use ply from the DIY shop I know it may be a little thicker 4mm, but as its does not need to butt upto another board where it can be seen I think that should be fine, I have a carpenter friend who is willing to cut the board for me to get the proper fitting.
I am a bit more postive about it now & glad Ive done this now & not ignored it.
Will update this post as I go along, quick thanks to 'Wizard & others' as I have read through most of your repair stories, prior to starting this 
Post last edited on 28/08/2013 15:58:07
|
08/11/2013 at 12:53am
Location: Anglesey
Outfit: Motorcycle & Tent
 View Profile
 Reply
Reply
 Quote
Quote
|
Joined: 25/9/2008 Silver Member 
Forum Posts: 144
| Site Reviews Total: | 11 |
|
| Site Reviews 2024: | 0  |
| Site Reviews 2023: | 0  |
| Site Reviews 2022: | 0  |
| Site Reviews 2021: | 0  |
| Site Reviews 2020: | 0  |
| Site Reviews 2019: | 0  |
| Site Reviews 2018: | 0  |
|
| Site Nights 2024: | 0 |
| Site Nights 2023: | 0 |
| Site Nights 2022: | 0 |
| Site Nights 2021: | 0 |
| Site Nights 2020: | 0 |
| Site Nights 2019: | 0 |
| Site Nights 2018: | 0 |
|
Well, this was what I did..
First I dried out the damp with a De-humidifier, I got several liters of water out which surprised me but obviously due to the air vents being open some of that would be from outside too.
I then scraped away the insulation from around the damaged wooden strut and placed new wood top and bottom to give the old piece some added support, I then used wood filler to fill where the rotten/ wet wood was, allowing to dry & sand down.
Well I deceided to go for Tiger Seal in the end, and sealed the original screw holes in the window frame (where Sealant had been used previously!!), and also used mastic over the top of the screw holes on the outside of the van.
Also noticed that where the panels met along the van that there was moisture & light coming through there too so I also used the Tiger seal to seal these areas also.


Cut the template for the new piece of Wall Board I used 4mm ply as it was in a corner on its own it would not cause any concern at the joints (being uneven)

Other end of the van in a right state whilst this is all going on !!

PVA'ing the Ply

Good fit & a smaller piece to fit the gap by the caravan end

Tiger Sealed to the rear & held in place any which way I could.

Looking good window seal only temporarily in place


Now for the Wall paper wow that was difficult to fit very fiddly I see why people use covered Wallboard, we got this from Tektura Excellent price & fantastic service, paper came in 1.20mtr Width.
Although we couldn't get a match to what we had this paper looked good, in place.

Alot easier to go back in than it was to take out I can tell you, I struggled locally to get the Peel Rivets to secure the seat frame to the wall, but sourced them on-line no problem

When I took the window seal out I cleaned all the old mastic from it, which I replaced prior to putting back on, stapled back into place, & fitted the fiddly insert.

Window Blind & Flynet fitted back into place

Finally Complete, very happy with my repair & the end result, I'm so glad & thankful that I took the advice offered on here & used Wizards pages, aswell as others, & saved me paying someone else a fortune to do it for me.
Ok it took me longer perhaps but time & effort make for a solid repair.
|
02/12/2013 at 4:56pm
Location: None Entered
Outfit: None Entered
 View Profile
 Reply
Reply
 Quote
Quote
|
Joined: 05/8/2010 Standard Member
Forum Posts: 2
| Site Reviews Total: | 0 |
|
| Site Reviews 2024: | 0  |
| Site Reviews 2023: | 0  |
| Site Reviews 2022: | 0  |
| Site Reviews 2021: | 0  |
| Site Reviews 2020: | 0  |
| Site Reviews 2019: | 0  |
| Site Reviews 2018: | 0  |
|
| Site Nights 2024: | 0 |
| Site Nights 2023: | 0 |
| Site Nights 2022: | 0 |
| Site Nights 2021: | 0 |
| Site Nights 2020: | 0 |
| Site Nights 2019: | 0 |
| Site Nights 2018: | 0 |
|
Quote: Originally posted by Dman_if on 28/8/2013
Bailey Pageant Auvergne 1999.
I noticed that the wall board to the top of my rear side window was soft so after our summer hols I decided to investigate, this is what I have found!
These were the screws from the Blind housing so I knew it was definately damp

I removed the blind holder, & you can see the Wall board is already split at the top.

So then proceeded to remove some of the wall paper, & it was upsetting to see this & as you can see some of the wall board was that damp it just came off like wall paper!!

This is when you think to youeself OMG what have I started here, took off more wall paper & some wall board


It does appear the ingress is narrowed down to the top of the window frame area.
Without any wall board left in place this is how it looks

At first thought I was assuming that the damp was coming through the panel seem just below the burgandy decal in the picture, but as it wasnt damp all the way along the wooded strut it cant be?

So looking at this next picture a close up of the damp wooden strut above the window frame you can see where the screw (which supports the window on the outside) is coming through the wood, making me think that no sealant must have been used in the screw hole during manufacture, however as Im no expert if anyone else has a theory I am open to suggestions, thx

Having tried to move some of the damp wood & eventually part of the strut itself, I left it overnight back today this is recent pic, you can see it appears to have dried out alot compared to yesterday.

My question now is should I leave it to dry out further & use a damp proofer & wood filler to render this strut.
Or should I just cut & remove the bad part & install a new piece.
I would prefer to install a new piece of wood but Im not sure how to go about cutting the old piece out as I am concerned re damaging the outside skin.
I have a dremel type tool so maybe I could use the small rotating saw on that, but the wood is stguck to the aluminuim skin so any assistance regarding removal of this would be greatly received 
Finally I will look to use a sealant (not silicone) to put into the screw holes and maybe use some mastic on the outside (wont be seen) to ensure a leak free area.
I am going to use ply from the DIY shop I know it may be a little thicker 4mm, but as its does not need to butt upto another board where it can be seen I think that should be fine, I have a carpenter friend who is willing to cut the board for me to get the proper fitting.
I am a bit more postive about it now & glad Ive done this now & not ignored it.
Will update this post as I go along, quick thanks to 'Wizard & others' as I have read through most of your repair stories, prior to starting this 
Post last edited on 28/08/2013 15:58:07
|
|
|
9945 Visitors online !
Free UKCampsite.co.uk Window Sticker - Recommend to Friend - Add a Missing Campsite
[Message Forums]
[Caravan Sites & Camping]
[Company Listings]
[Features / Advice]
[Virtual Brochure]
[Shop!]
[Reception]
[Competitions]
[Caravans & Motorhomes For Sale]
[Event Diary]
[Contact Us]
[Tent Reviews]


Please note we are not responsible for the content of external sites & any reviews represent the author's personal view only. Please report any error here. You may view our privacy and cookie policy and terms and conditions here. All copyrights & other intellectual property rights in the design and content of this web site are reserved to the UKCampsite.co.uk © 1999 - 2024 |

Advertisement
|
|
|


