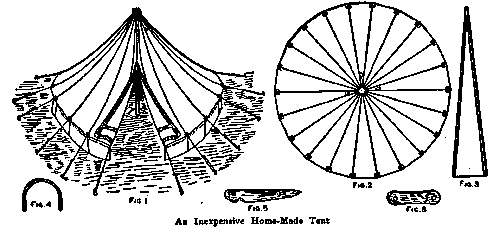
A bell tent is easily made and is nice for lawns, as well as for a boy's camping outfit. The illustrations show a plan of a tent 14-ft. in diameter. To make such a tent, procure unbleached tent duck, which is the very best material for the purpose, says the Cleveland Plain Dealer. Make 22 sections, shaped like Fig . 3, each 10 ft. 6 in. long and 2 ft. 2 in. wide at the bottom, tapering in a straight line to a point at the top. These dimensions allow for the laid or lapped seams, which should be double-stitched on a machine. The last seam sew only for a distance of 4 ft. from the top, leaving the rest for an opening. At the end of this seam stitch on an extra gusset piece so that it will not rip. Fold back the edges of the opening and the bottom edge of the bell-shaped cover and bind it with wide webbing, 3 in. across and having eyelets at the seams for attaching the stay ropes. Near the apex of the cover cut three triangular holes 8 in. long and 4 in. wide at the bottom and hem the edges. These are ventilators. Make the tent wall of the same kind of cloth 2 ft. 2 in. high. Bind it at the upper edge with webbing and at the bottom with canvas. Also stitch on coarse canvas 6 in. wide at the bottom, and the space between the ground and the wall when the tent is raised, fill with canvas edging. Stitch the upper edge of the wall firmly to the bell cover at the point indicated by the dotted line, Fig. 2.
Ill: An Inexpensive Home-Made Tent
For the top of the tent have the blacksmith make a hoop of 1/4-in. round galvanized iron, 6-in. diameter. Stitch the canvas at the apex around the hoop and along the sides. Make the apex into a hood and line it with stiff canvas. Have the tent pole 3 in. in diameter, made in two sections, with a socket joint and rounded at the top to fit into the apex of the tent.
In raising the tent, fasten down the wall by means of loops of stout line fastened to its lower edge and small pegs driven through them into the ground, Fig. 5. Run the stay ropes from the eyelets in the circular cover to stakes (Fig. 5) stuck in the ground. Use blocks, as in Fig. 6, on the stay ropes for holding the ends and adjusting the length of the ropes.


